|
Your honour! |
|
Euer Ehren! |
|
To my shame I have to admit that I am going to commit a horrible crime: Plagiatry! |
|
Zu meiner Schade muss ich gestehen, eine gar schreckliche Schandtat zu begehen: Plagiatrie! |
|
Kindly excuse my intent to copy a T-shirt somebody else designed, but the referred piece of clothing is one of the best I've ever owned. If it only wouldn't have one flaw: It is not black! |
|
Bitte entschuldigen Sie mein Vorhaben ein T-Shirt, welches jemand anders entworfen hat, nachzumachen, aber der erwähnte Kleidungstück ist eines der besten, die ich je besaß. Es hat nur einen Makel: Es ist nicht schwarz! |
|
And since it is quite old and I'm not able to buy it anymore... I am going to copy it's pattern. |
|
Weil es schon recht alt ist und ich es nirgendwo mehr kaufen kann, werde ich einfach den Schnitt abnehmen. |
|
Don't we all have that particular garment we found somewhere, that fits just perfect, we love it to the end, but we just can't buy it anymore? Well...we craftsters are lucky -€“ WE just make a new one! |
|
Haben wir nicht alle schon einmal dieses Kleidungsstück besessen, das perfekt sitzt, totgeliebt wurde und nirgendwo mehr erwerbbar ist? Hach, da haben wir Nähtanten ja Glück - wir machen's einfach neu! |
|
(P.S.: I'm very sorry, this is the first tutorial I've ever written, so please inform me about anything that is not clear. |
|
(P.S.: Tut mir leid, das ist die erste Anleitung, die ich schreibe. Gebt mir bitte Bescheid, wenn irgendetwas nicht verständlich ist. |
|
Appraisal: |
|
Bestandsaufnahme: |
|
First of all let's take a closer look on the original: |
|
Zuerst schauen wir uns das Original mal etwas genauer an: |
|
|
||
|
A T-shirt. Yay... |
|
Ein T-Shirt. Yay... |
|
Fun fact: Every time I'm writing this without an exclamation mark, in my head it sounds like in Monthy Python's Holy Grail (including the narrator's voice): |
|
Fun fact: Jedes Mal, wenn ich das ohne Rufzeichen schreibe, klingt das in meinem Kopf so wie in Monty Python's Ritter der Kokosnuss: |
|
Enthusiasm, baby! Ehrm...yes. |
|
Enthusiasmus, baby! Äh, ja. |
|
Oh, you can't see any details? What a pity! Fortunately I'm extraordinary generous today, so here you go: |
|
Oh, ihr seht gar keine Details? Wie schade! Glücklicherweise bin ich heute besonders generös. Bitteschön: |
|
|
||
|
The back. This part is actually not really difficult. It consists of one big part with something like a cut-out between the shoulders. This cut-out is edged with bias tape and hold together by an approximately 3cm wide strap of fabric. |
|
Die Rückseite. Der Teil ist eigentlich relativ einfach. Er besteht aus einem großen Teil mit sowas wie einem Cut-Out zwischen den Schultern. Dieses Loch ist mit Schrägband gesäumt und wird im Nacken durch einen ca. 3cm breiten Streifen zusammengehalten. |
|
|
||
|
The sleeve. Easy to sew, annoying to copy - it is ruffed on the upper side and consists of only one part. For the seam, we'll again need bias tape. |
|
Der Ärmel. Leicht zu nähen, eklig, um ihn abzuzeichnen. Er ist an der Oberseite gerüscht und besteht aus nur einem Teil. Gesäumt ist er wieder mit Schrägband. |
|
|
||
|
The front side. I really love the square-cut neckline. And the ruffles. And the waistband. So, how is this constructed? |
|
Die Vorderseite. Ich liebe den eckigen Ausschnitt. Und die Rüschen. Und das Taillenband. Also, wie macht man das? |
|
Let's go from the bottom up: Part 1, a larger piece of fabric that goes up to Part 2, the waistband. Attached to this are parts 3 (lining) and part 4 (the fancy flouncy shit - oops... Language, Marzi!). :D Parts 3 and 4 are turned over - that should make it easier for sewing, because we won't have to seam it. |
|
Fangen wir unten an: Teil 1, ein großes Stoffstück, geht rauf bis Teil 2, dem Taillenband. Daran angemacht sind die Teile 3 (Futter) und 4 (der fancy Rüschenshit - ups, beherrsch dich, Marzi!). :D Teile 3 und 4 sind miteinander verstürzt - das sollte es angenehmer zu nähen machen, weil man nicht um die Ecke säumen muss. |
|
I don't want to go shopping, so today I'll use some old newspapers to create the pattern. If you have a proper transparent pattern paper, use this. It is a lot simpler, if you can just put the garment UNDER the paper and trace the cut parts. If doing so, you won't need to fold the fabric all the time. |
|
Da ich keine Lust habe einkaufen zu gehen, nehme ich einfach alte Zeitungen für das Schnittmuster. Wenn ihr aber vernünftiges transparentes Schnittmusterpapier habt, nehmt dieses. Ist viel einfacher, weil man es einfach auf das Kleidungsstück legen kann und durchpausen. Und man muss nicht ständig falten. |
|
We are going to draw around every single cut part. Make sure that the fabric of that part lies very flat on your table (or in my case: the floor). Don't forget to add seam allowances! |
|
Wir zeichnen jetzt um jedes einzelne Schnittteil. Passt auf, dass der Stoff ganz flach auf dem Tisch (oder in meinem Fall Boden) liegt. Nahtzugaben nicht vergessen! |
|
Turn your garment on the reverse side and place it carefully on the newspaper. As a little motivation, I start with the back, because it's the easiest part to copy. Draw around. |
|
Dreht euer Kleidungsstück auf links und legt es vorsichtig auf's Papier. Zur Motivation fange ich mit dem Rückenteil an, weil es das einfachste ist. Einmal drumherum zeichnen. |
|
|
||
|
Turn the sleeves inside, so you can also copy the sleeve crown. Do the same with the fabric strap in the neckline. |
|
Krempelt die Ärmel nach innen, damit ihr die Schulterkugel abzeichnen könnt. Dasselbe macht ihr in der Nackenpartie. |
|
|
||
|
NOTE: As I am lazy, I only copy one half of the shirt and fold the paper in the middle while I'm cutting it. |
|
ANMERKUNG: Weil ich faul bin, kopiere ich nur das halbe Shirt und falte das Papier beim Ausschneiden einmal in der Mitte. |
|
|
||
|
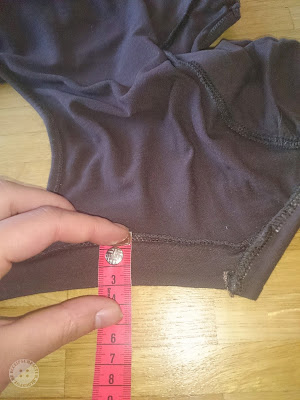
Next: The neck strap. Not good to draw around, so we measure it out. It is 3cm wide, on the short side (neck) 23cm long, the long side is 27cm and it is a bit curvy, so we also measure the curve. Before drawing, don't forget the seam allowance again. ;-) (I did, shame on me.) |
|
Weiter: Der Stoffstreifen im Nacken. Kann man schlecht drumherum zeichnen, also messen wir ihn aus. Er ist 3cm breit, an der kurzen Seite (Nacken) 23cm lang, die untere Seite ist 27cm. Er ist etwas kurvig, das müssen wir also auch ausmessen. Denkt wieder an die Nahtzugabe. ;-) (Die habe ich vergessen) D; |
|
|
||
|
Now let's go to the front. Part 1 and 2 are simple again. Draw around part 1 and measure the waistband. I didn't take pictures of these steps. |
|
Jetzt widmen wir uns dem Vorderteil. Teil 1 und 2 sind wieder einfach. Einmal um Teil eins herumzeichnen und Teil 2, das Taillenband wieder ausmessen. Davon habe ich jetzt keine Fotos gemacht. |
|
Now copy the lining. For that, fold the sleeves to the inside again. |
|
Jetzt wird das Futter abgezeichnet. Dazu die Ärmel wieder nach innen krempeln. |
|
Noooooow.....the sleeves. Gross. I have no idea what I'm doing [Insert meme here] :D Damn ruffles. Let's try it with measuring. The bias tape should be 17cm. The lenght on the shoulder part is 10cm, the armpit length is 4cm. Okay. |
|
Soooo...jetzt kommen die Ärmel. Buärgh. Ich habe keinen Plan, was ich da mache. :D Blöde Rüschen. Versuchen wir es mit Messen. Das Schrägband am Abschluss ist 17cm. Oben sollte der Ärmel 10cm sein, unten 4cm. Ok. |
|
Now take the front part and the back part of the shirt and put them on the floor, the shoulder edges should meet. Then move those edges away from each other but ensure they're still parallel. Now you can draw the shoulder crown. |
|
Nun die Vorder- und Rückseite mit den Schulterkanten aufeinandertreffend auf den Boden legen. Vorsichtig diese beiden Kanten auseinanderziehen, dabei aber aufpassen, dass sie parallel bleiben. Jetzt sollte man die Schulterkugel zeichnen können. |
|
|
||
|
Now you have the measurements. The shoulder should be 10cm (plus seam allowance), the armpits 4cm (plus allowance). For the shoulder draw a line in the middle, the armpits can be marked as a circle with a radius of 6cm around the end of the shoulder crown. |
|
Wir haben ja gemessen. Die Schulter sollte 10cm sein (+Nahtzugabe!), die Achseln 4cm (+Nahtzugabe). Fürr die Schulter malt ihr eine Linie in der Mitte, die Achseln könnt ihr am Ende der Schulterkugel als Kreise mit einem Radius von 6cm zeichnen. |
|
|
||
|
Now the seam should be 17cm (plus allowance). Add how much ever is needed for the ruffles (measure on the shoulder part - I took 8cm). That makes 17 + 2cm allowance + 8cm ruffles = 28cm. Now parted in two, this is 14cm. |
|
Der Abschluss sollte 17cm weit werden. Fügt hier noch das hinzu, was gerüscht werden soll (zwischen den Schulterteilen messen, bei mir sind's 8cm). Dazu noch Nahtzugabe ergibt bei mir 28cm. Die durch 2 geteilt sind 14cm. |
|
Measure those 14cm from the 10cm (resp. 12cm) mark and mark where it meets the circle. Tada! Looks like a sleeve. |
|
Diese 14cm messt ihr nun von der 10 (bzw. 12) cm-Markierung aus ab und schaut, wo sie auf den Kreis trifft. Tada! Das sieht doch wie ein Ärmel aus. |
|
|
||
|
That was way too complicated, wasn't it? Anyone an idea how to make it easier? |
|
Hm, das war jetzt zu kompliziert, oder? Hat jemand 'ne Idee wie's einfacher geht? |
|
Last but not least: The cleavage. Take part 3 (the lining) and place it on your newspaper. Measure the distance in the aperture. |
|
Zu guter Letzt: Der Ausschnit. Nehmt Teil 3 (das Futter) und legt es auf das Papier. Messt den Abstand des Ausschnitts. |
|
Now decide how many ruffles you want. I chose a factor 3. Copy the pattern of part 3, but increase the cleavage on 300% width. Ehrm....is that clear? |
|
Jetzt entscheidet ihr euch, wie sehr ihr das gerüscht haben wollt. Ich habe mich mal wieder für den Rüschelfaktor 3 entschieden. Also macht ihr den Ausschnitt einfach 3x zu breit. |
|
|
||
|
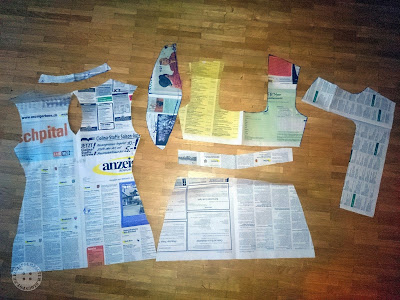
Now we have a empire-waist T-shirt pattern. Well..I have a pattern - you don't. But I'm sure you can try this out with whatever you want to copy. |
|
So, jetzt habt ihr ein Schnittmuster für ein Shirt mit Empire-Taille. Naja, ICH hab eines - ihr nicht. Aber ich bin sicher, ihr könnt das jetzt auch mit 'nem anderen Stück ausprobieren. |
|
|
||
|
Next time I'll show you how to turn this pattern into something wearable. Newspapers aren't that comfortable. |
|
Nächstes Mal zeige ich euch, wie man das Schnittmuster in etwas Tragbares verwandeln kann. Zeitungen sind so unbequem. |
|
I really hope my explanations were clear enough. Please leave a comment, if you have any further questions. I promise I'll answer! :) |
|
Ich hoffe inständig, dass meine Erklärungen halbwegs nachvollziehbar waren. Bitte schreibt doch einen Kommentar, wenn ihr Fragen habt. Antwort garantiert! :) |
|
Kisses, |
||


